Google Analytics
The Google Analytics extractor pulls raw data from the Google Analytics Reporting API.
Google Analytics Setup
In order to access your Google Analytics data, you will need:
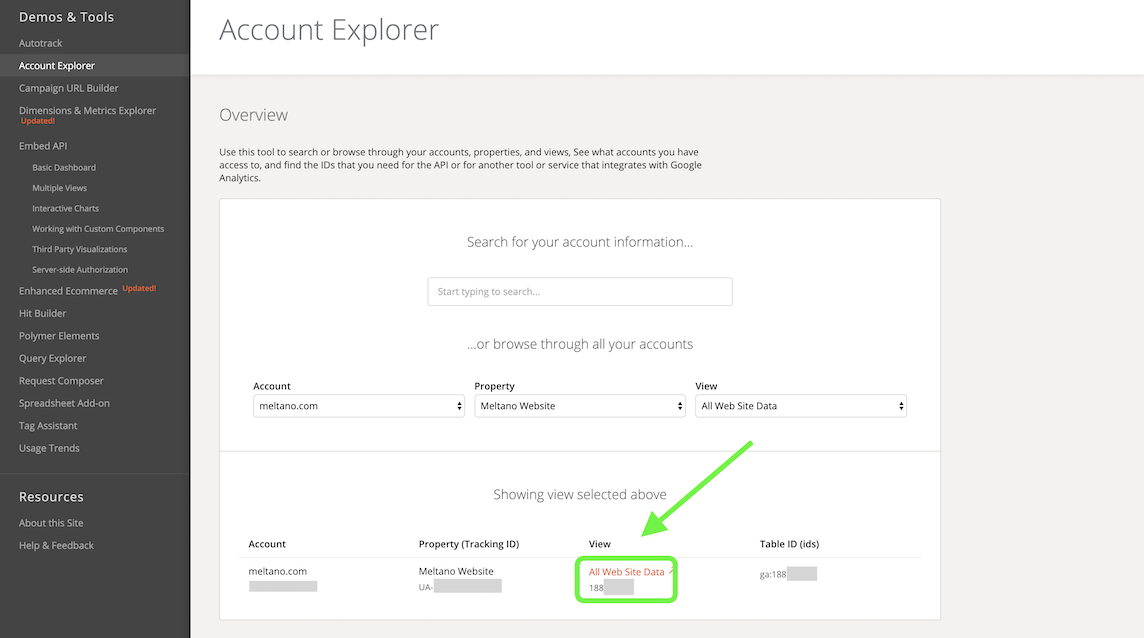
The ID for the Google Analytics View you want to fetch data from.
You can easily find it by using Google Analytics Account Explorer.
Authorization to access your Google Analytics account.
This extractor supports service account based authorization, where an administrator manually creates a service account with the appropriate permissions to view the account, property, and view you wish to fetch data from.
To access your Google Analytics Account, it needs the Analytics Reporting API and the Analytics API enabled. These need to be enabled for a project inside the same organization as your Google Analytics account (check the next section for more details).
A way to authenticate when accessing the Analytics APIs
When you create a service account Google gives you a json file with that service account's credentials called the
client_secrets.json, and that's all you need to pass to this tap.
Creating Service Account Credentials
TIP
If you have a valid client_secrets.json for a service account, you can skip this section.
As a first step, you need to create or use an existing project in the Google Developers Console:
Sign in to the Google Account you are using for managing Google Analytics (you must have Manage Users permission at the account, property, or view level).
Open the Service accounts page. If prompted, select a project or create a new one to use for accessing Google Analytics.
Click "Create service account"
In the Create service account window, type a name for the service account, and select Furnish a new private key. Then click Save and store it locally as
client_secrets.json.If you already have a service account, you can generate a key by selecting 'Edit' for the account and then selecting the option to generate a key.
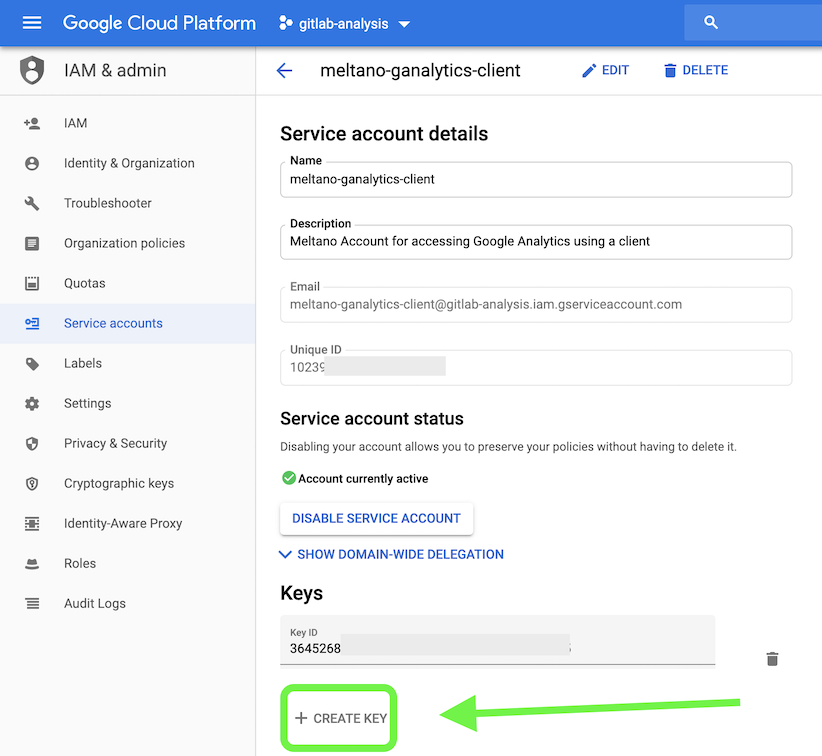
Your new public/private key pair is generated and downloaded to your machine; it serves as the only copy of this key. You are responsible for storing it securely.
Linking Credentials to Google Analytics
The newly created service account will have an email address that looks similar to:
quickstart@PROJECT-ID.iam.gserviceaccount.com
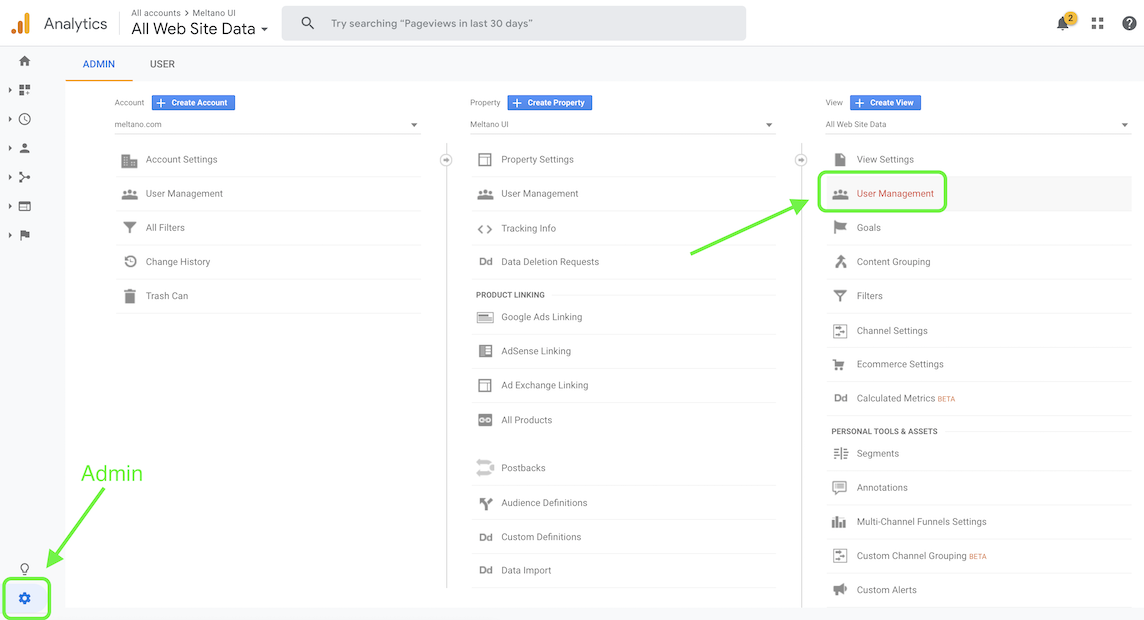
Use this email address to add a user to the Google analytics view you want to access via the API. Only Read & Analyze permissions are needed.
Enabling the APIs
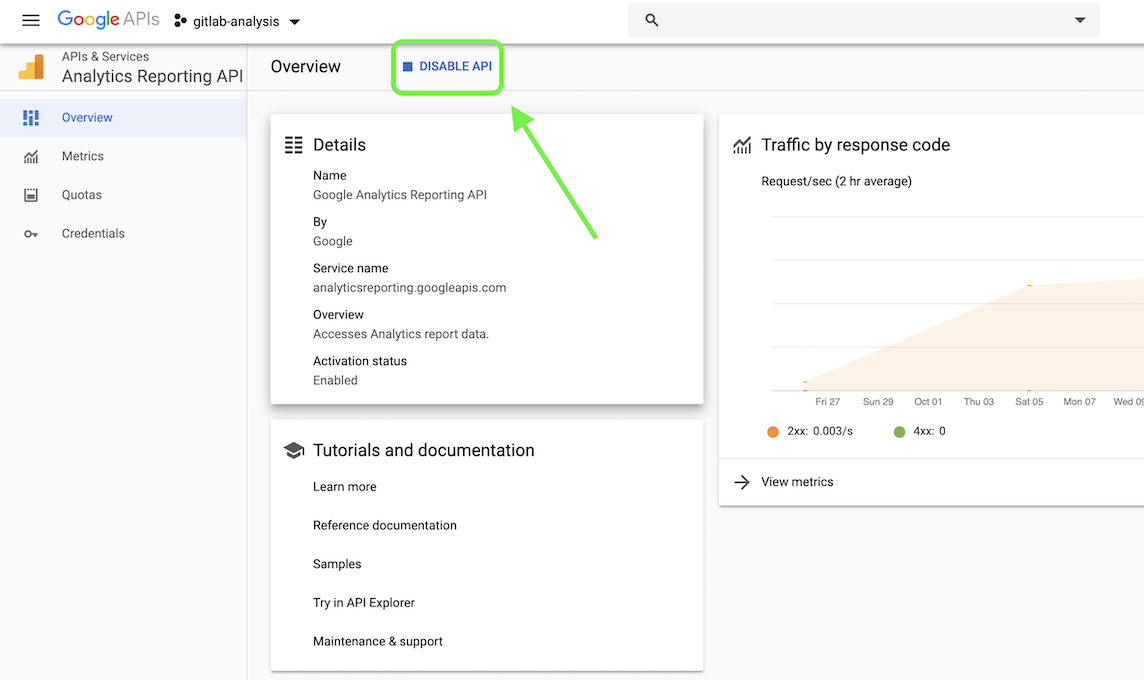
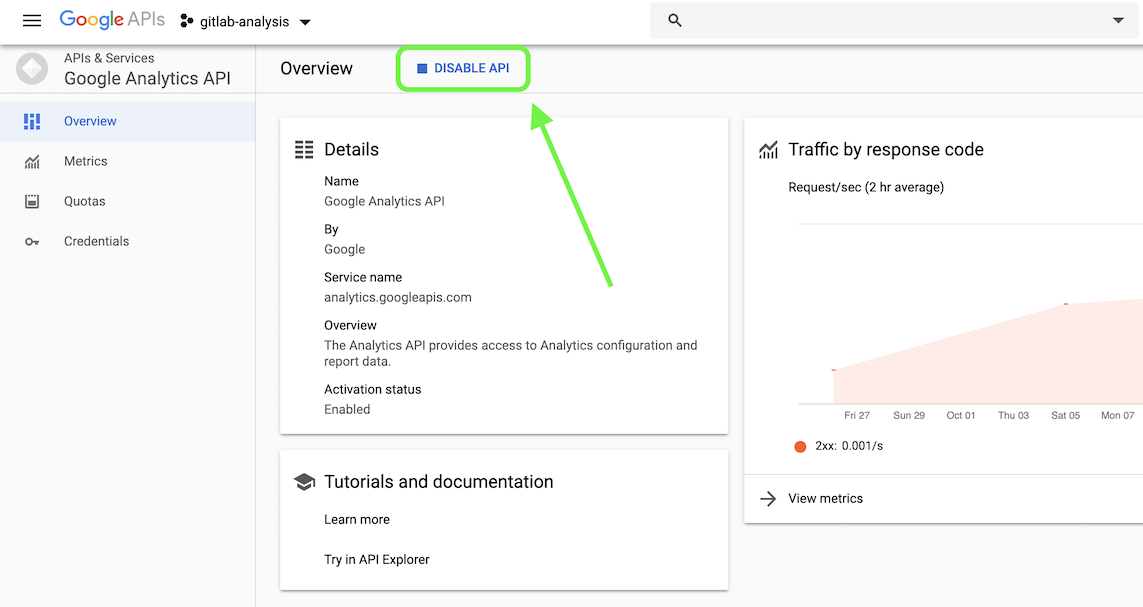
Visit the Google Analytics Reporting API dashboard and make sure that the project you used in the previous step is selected.
From this dashboard, you can enable/disable the API for your account, set Quotas and check usage stats for the service account you are using with the Google Analytics extractor.
Visit the Google Analytics API dashboard, make sure that the project you used in the previous step is selected, and enable the API for your account.
Meltano Setup
Prerequisites
Configuration
Open your Meltano instance and click "Pipelines" in the top navigation bar. You should now see the Extractors page, which contains various options for connecting your data source.
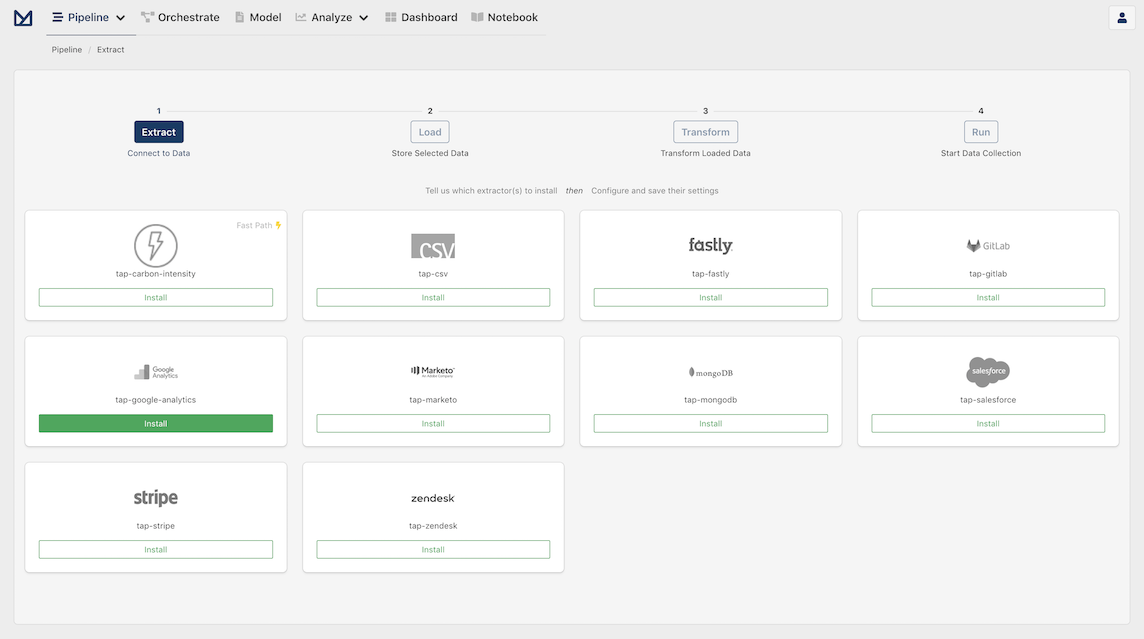
Let's install tap-google-analytics by clicking on the Install button inside its card. When it's finished loading, you should see a configuration modal appear.
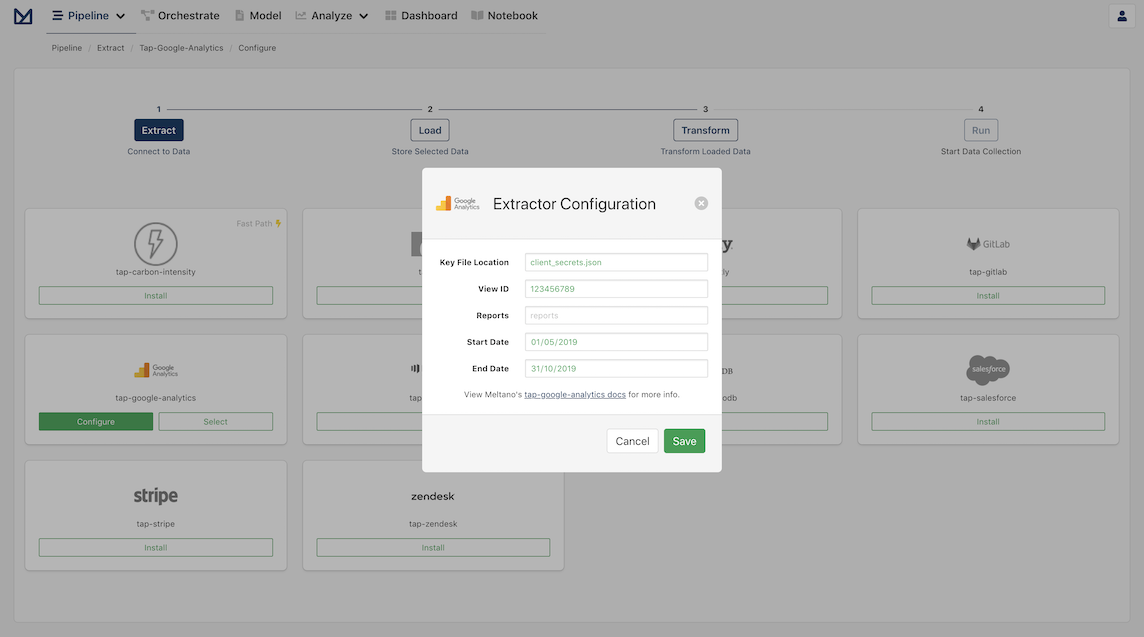
For the Key File Location, you will need to upload your client_secrets.json into the extract folder of your Meltano project. If Meltano runs on a cloud server, this can be done via an FTP client or logging in through your terminal.
Need help with FTP?
If you need help setting up your FTP client, make sure to check out our guide on how to setup a FTP client to connect to your Meltano project.
Uploading with FTP
Assuming your FTP client is setup, you can upload your file via FTP with the following steps:
Login to your Meltano project (e.g.,
meltano.meltanodata.com) with your FTP credentials (e.g.,meltano_ftp/password).This should open a directory that contains folder such as
analyzeextractloadmodel
Open the
extractfolder by double clicking it.Locate the
client_secrets.jsonfile on your local machine in the left panel.Click and drag your
client_secrets.jsonfile over to the openedextractfolder on the right panel.
Once it appears in the right panel, everything is good to go!
For the View ID, enter the ID you retrieved using Google Analytics Account Explorer
For the Start Date, choose the date when you want to start extracting data for.
For the End Date, it is set to yesterday by default if you do not configure a date. However, you can choose to set a specific end date for your data set if you want.
Click Save to finish configuring the extractor and progress to the next step: "Configure the Loader".
TIP
Ready to do more with data from Google Analytics?
Check out our Google Analytics API + Postgres tutorial to learn how you can create an analytics database from within Meltano, and start analyzing your Google Analytics data.
Advanced: Command Line Installation
- Navigate to your Meltano project in the terminal
- Run the following command:
meltano add extractor tap-google-analytics
If you are successful, you should see Added and installed extractors 'tap-google-analytics' in your terminal.
Configuration
- Open your project's
.envfile in a text editor - Add the following variables to your file:
Required:
export GOOGLE_ANALYTICS_API_CLIENT_SECRETS="client_secrets.json"
export GOOGLE_ANALYTICS_API_VIEW_ID="YOUR VIEW ID"
export GOOGLE_ANALYTICS_API_START_DATE="2019-02-01T00:00:00Z"
Optional:
export GOOGLE_ANALYTICS_API_REPORTS="cli_reports.json"
export GOOGLE_ANALYTICS_API_END_DATE="2019-06-01T00:00:00Z"
Check the README for details.